When photographing the night sky we get all kinds of artefacts in our images; planes flying through our field of view, leaving a trial of 3 stripes because of their lights, satellite passing through our field of view and of course also hot pixels. I know some people throw away subs that contain plane trails or even satellite trails, but please stop doing that! You can get rid of those really easy by using pixel rejection in the stacking process.
Let’s first look at what the pixel rejection actually does;
A brief explanation of pixel rejection
When integrating multiple images, the stacking process is very good at getting rid of random noise. I described this in a previous posting here; The benefits of adding more subs to your stack.
However, the artefacts we are talking about here is not random noise and thus the method of adding more subs together alone might not be enough to get rid of this bad signal. That’s where the pixel rejection comes in; to get rid of non-random bad signal.
So pixel rejection does not help you to get rid of noise, it is only used to get rid of unwanted signal!
![]()
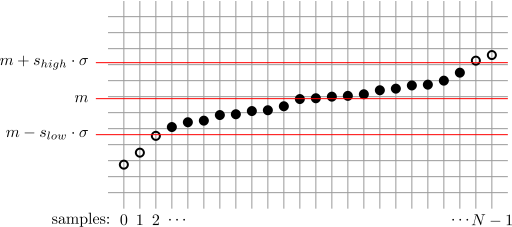
This unwanted signal is of small scale and can easily get rid of by some statistical methods. These methods are the different pixel rejection algorithms you can use. What they do is get rid of ‘outliers’. As we’ve seen before, a pixel will hold signal that is made up by the ‘real’ signal and some random noise. That signal for this particular pixel will fall in a range of values according to a Gaussian distribution. If a plane flies through your field of view it will give an incidental signal to the pixels that is unique for that particular frame. So the value for a pixel that captures this plane signal will be way outside the normal distribution of the signal and thus we can easily reject the value of this pixel for the particular frame it recorded the plane flying through your fov.
You can imagine this determination if some value is an outlier or not will become increasingly easy when you add more frames to it. More frames means a more evenly distribution of signal and thus an easier detection of outliers. That is why PixInsight offers different rejection methods that can be used for different amounts of subs in a stack.
The pixel rejection methods of PixInsight
PixInsight offers a view different methods that you can choose to get rid of the outliers. The details and differences of these methods are quite complicated and I don’t want to go into the detailed math of them now. Let’s look briefly at the different pixel rejection methods and when you (theoretically) should be using them.
- Min/Max Clipping
- Percentile Clipping
- Sigma Clipping
- Winsorized Sigma Clipping
- Averaged Sigma Clipping
- Linear Fit Clipping
This is the most basic way of rejecting pixels; just get rid of the maximum value and the minimum value. Very effective in terms of rejecting outliers, but less so for keeping a good SNR.
I recommend to NEVER use this method.
PixInsight’s documentation says to use this when you have between 3 and 6 frames. Most of the times you will (should!) have more than 6 frames to stack anyways, so this the percentile clipping method can be skipped as well in most cases.
The Sigma clipping method is iterative and determines the central value. The values that lie outside of the determined range (set in Pixel Rejection(2) part of the Integration Process) will be rejected.
This method can be used if you have more than 8 to 10 frames to stack.
This method is similar to Sigma clipping but differs in the way it calculates parameters. This method can be superior when adding a larger number of frames.
Personally I use this when I have 10 – 20 frames to stack.
Another variation of the Sigma clipping method. Personally I never use this one.

The linear fit method determines the straight line that has the best fit to the data points and rejects values that have a greater vertical distance to this line than the allowed amount. This threshold can be adjusted in the PixelRejection(2) part of the Integration Process.
This method works very well with large amount of subs. When you have 25 or more subs (and you should!) use this method.
Conclusion
Pixel rejection is a robust way to get rid of unwanted signal in your images, but it comes at a cost of less SNR in the resulting stack. Remember: we are stacking to get rid of (random) noise, and we use pixel rejection to get rid of unwanted signals. Using pixel rejection WILL give you a lower resulting SNR. Most of the time I use either Winsorized Sigma clipping (when I have < 20 subs) or Linear fit clipping (20+ subs). Unless you have some signal you can't get rid of with default settings, leave them unchanged. Sure you might be able to get better results in terms of preserving SNR while still getting rid of your unwanted signal if you carefully tweak the settings, but this will take a lot of time at little to no rewards in my experience.

How can I keep the airplane trails, but reject satellite and cosmic rays in a stack of more than 35 images?