Quite a while ago I wrote a short test on the little cheap gem amongst the Nikon lenses; the 50mm F1.8 D. This looked promising enough to test the lens for real under the stars. Let’s look at how this lens is performing with astro photo’s.
Using the Nikkor 50mm F1.8 for astrophotography
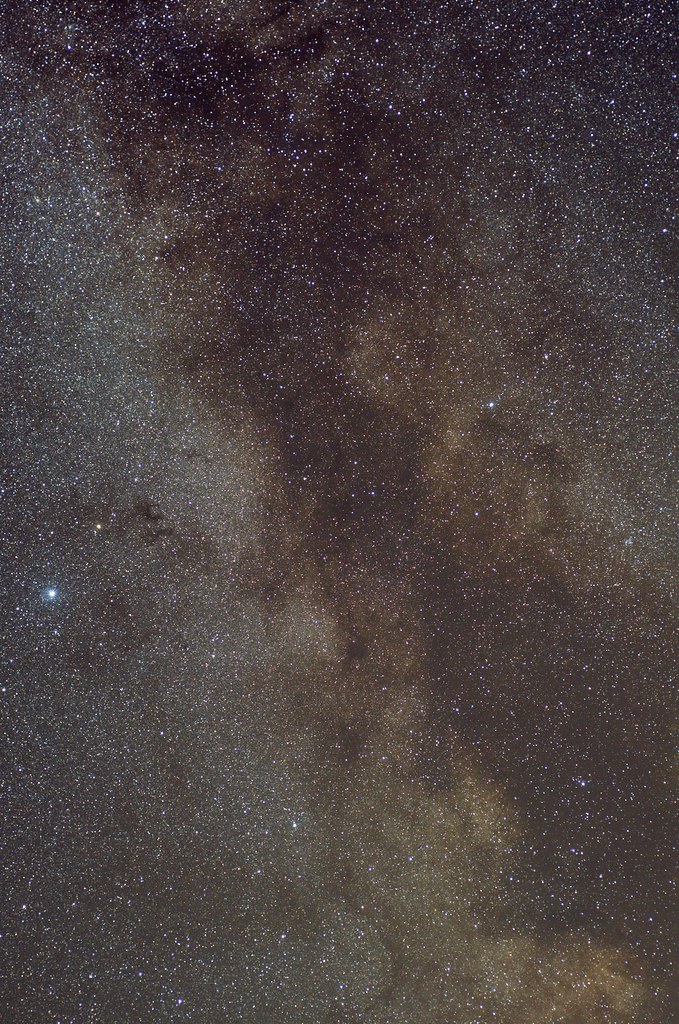
In the test I noticed that the lens seems to be sharpest when used at F2.8 so I used this setting to test it out. Below you see a single shot of 230sec. of the milky way:

At first glance this looks very good in my opinion. No barrel nor pin-cushion distortion, no noticeable coma, just a nice wide field picture of the Milky Way.
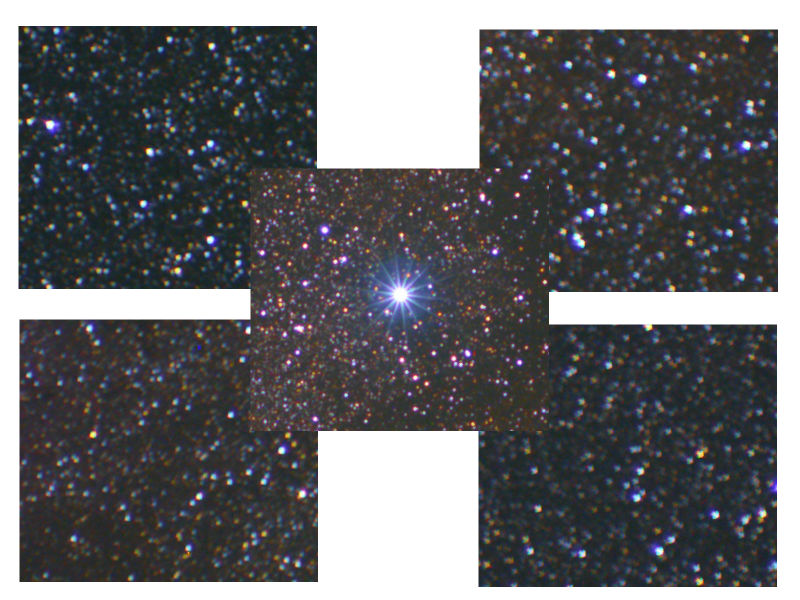
Let’s take a closer look at the corners and center of the image at 100%;
If you look really close the upper corners have very little distortion of the stars, but the center and bottom cuts look just fine. My guess would be that this is a very slight astigmatism. But nothing to worry about since you can only notice it in the corners when viewed at 100%. And let’s be honest, how frequently do you view 3280 x 4948 pictures at 100%?
Furthermore we can see the stars are nice and clean; no halo’s and very very little purple fringes, only on the brightest stars. So also from chromatic abberation perspective, the Nikkor 50mm F1.8 is an excellent lens!
Let’s take a look at another example. Here is a wide field view of the constellation Cygnus. Again the Nikkor 50mm was used at F2.8. This image is a stack of 9 frames of 300secs. each.

Again the quality of the image looks perfect in terms of absence of distortions and nice pin-point round stars. But, we only will know for sure if we inspect the image at 100%. So let’s take a look at the corners and center of the image:

Inspecting the stars in the corners and the center of the image at 100% gives us the same distortions like in the previous image, although the slight distortion of the stars is situated top left and bottom left this time due to the different orientation of the frame. The center gives us a perfect star and the others sides are fine as well.
Conclusion on using the Nikkor 50mm for astrophotography
For me this lens is just a perfect little and affordable lens to do wide field astrophotography with. When used at F2.8 it produces an image for wich the quality is absolutely fine when viewed on ‘normal resolutions’, although we can see some distortion of stars in two of the corners when viewed at 100%. Whether this is common in all Nikkor 50mm F1.8 lenses or if this is just a minor issue with mine we don’t know (at this moment) of course.
Considering the price of around $129,- for this lens, I can highly recommend adding this lens to your astrophotography gear!
If you own the Nikkor 50mm F1.8 yourself I would be very interested in your results and experiences! Lets hear it in the comments…


I was wondering what other settings you used. Iso, white balance…
also is the photo edited at all?
For long exposures I always shoot at ISO800 and just use auto white balance. I think I used only a quick curves adjustment to improve contrast and color. (and of course the initial stretch since I shoot in RAW)
Edit 2016: Please note that the ideal ISO to use is lower than the mentioned 800. Didn’t know that at the time 😉
Thanks for the reply
I’m just getting into astrophotography so it’s nice to see different settings with images.
Beautiful pictures, and I agree, this lens is excellent. I do have a question though.
How did you not get star trails when using such long exposure times? Typically, exceeding 10-12 seconds of exposure time with this long a focal length should result in some trailing, I thought.
Hi Hisham,
That’s because I’m using a mount that is tracking the movement of the earth, thus cancelling out the apparent movement of the stars in your picture 🙂
I gather you’re using a sky tracker?
Nice pictures. I am thinking of buying a prime too, mainly for Astrophotography. I am looking for a lens that’s affordable but also fast. Should I buy a 35mm prime or 50mm? Since my camera has a APSC sensor 50 mm would effectively increase the focal length to around 75mm wouldn’t it? Would that be an issue for wide field astrophography? For instance I like to take pictures of meteor showers, and I am currently using a standard 18-55 kit lens which has terrible aperture but 18mm gives me a lot of field to capture meteors. Are there any cheap lens with relatively less focal length AND a good aperture? Do reply whenever possible. Thank you.
Thank you for your comment and good question!
It’s impossible to give a definitive answer as to what focal length would be best; all different ones are good for different type of photo’s. However, 50mm on a crop sensor is indeed the same as 75mm on full frame and although that is excellent for a lot of wide field subjects (I use 80mm a lot!), it would be way to much for a meteor shower. 50mm to 80mm is very nice for widefield images of the milky way for instance.
If you want to take meteor shower pictures or other pictures where you also show the ground/horizon then you’ll want to stay below 30mm.
The Samyang lenses are most affordable in this range. They have an excellent 14mm which I use myself, but also 24mm.
If your primary goal is photographing meteor showers I’d recommend the 14mm Samyang!
Hope this helps
Hi, I have this lens and have been trying it out for widefield astrophotography, but I have found that at f2.8 I get an objectionable violet tinge to all my stars that is very difficult to remove with processing. I don’t see you mention this as being an issue for you. Have you come across this, and if so, how did you overcome it?
Thanks in advance & clear skies!
Somehow missed this comment, apologies for the late reply.
I didn’t notice the fringing in my photo’s. But it should be easy to remove with Lightroom’s Defringe
Hi Greg
Is the 50mm 1.4G still good for astrophotography? I own this and would like to know before taking it out for a test soon! Thanks
Hey Greg,
I have a Nikon D5200 and a 50mm 1.8g. How are you able to set the shutter speed to 230 seconds?
use the camera in Bulb mode and then use external timer or a remote
So you stacked all your images? Is there a way to get the whole look in one shot?
I mean stacking is doable but I was just wondering if the other scenario was possible.
Hi, I can see using bulb mode for the high shutter speed but what if you don’t have the earth move tracker
Then you’ll be restricted to shorter exposure times 😉
Between 7 and 10 sec on a crop sensor and between 10 to 15 seconds on a full frame sensor to be precise 😉
Hi, thanks for the in depth write up, Would the lens be ok for capturing the Northern Lights?
For something like the Northern Lights I’d prefer a more wide angle lens like the Samyang 14mm for instance.
I have just bought the Tokina 11-16mm 2.8, to do some milkyway shots! Any suggestions? Your input would be very much appreciated as I am a beginner! Thanks!
Hi there, O have a NIKON D300 and the have used the 50mm 1.8 lens to do some astro. I am a beginner and I was wondering how would you go about getting an image without a tracker? Many shots at say 5-7sec and then stacked for noise reduction? Any info will be appreciated! Thanks. Paskalis
Hellllooo, i have a question. Is the Nickon D3400 good for deep-sky photos? If yes, is it good to have it with these lens: NIKKOR 50 mm f/1.8G AF-S, or with 35 mm? Will the deep-sky photos look good? If it was even possible to photograph them 😀
I hope you will answer 😀
Have a nice sky 😀
Probably too late here but one issue with the d3400 is it doesn’t have wifi or a port for an external shutter release, leaving you to trigger manually or use the IR wireless, in which case you need to be in front of the camera