This time of year a lot of people will point their telescopes and lenses at the Pleiades, M45. Maybe it is so appealing because it is so bright and visible with the naked eye. It might seem an easy target, but because the stars are so bright and the associated nebulosity fairly faint this can be quite a challenge to capture and especially process properly. Especially if you have to deal with light pollution .
dynamic range and color in the stars
I feel I’m not even exaggerating if I say that 95% of the images of the Pleiades fail to capture and show the dynamic range of this field of view properly. Instead, we most often see a pitch black (clipped) background with blown out and white clipped stars. That is if the color of the image is correct, as it is not uncommon to have a blue hue to the image.
That’s such a shame! There is actually quite some color in the stars in the field of fov of the Pleiades. And capturing and processing this properly will vastly improve the resulting image you get of the Pleiades.
Look at some examples of great Pleiades (M45) images. The first two were taken by Roberto Colombari and the last one is made by Hermann von Eiff.


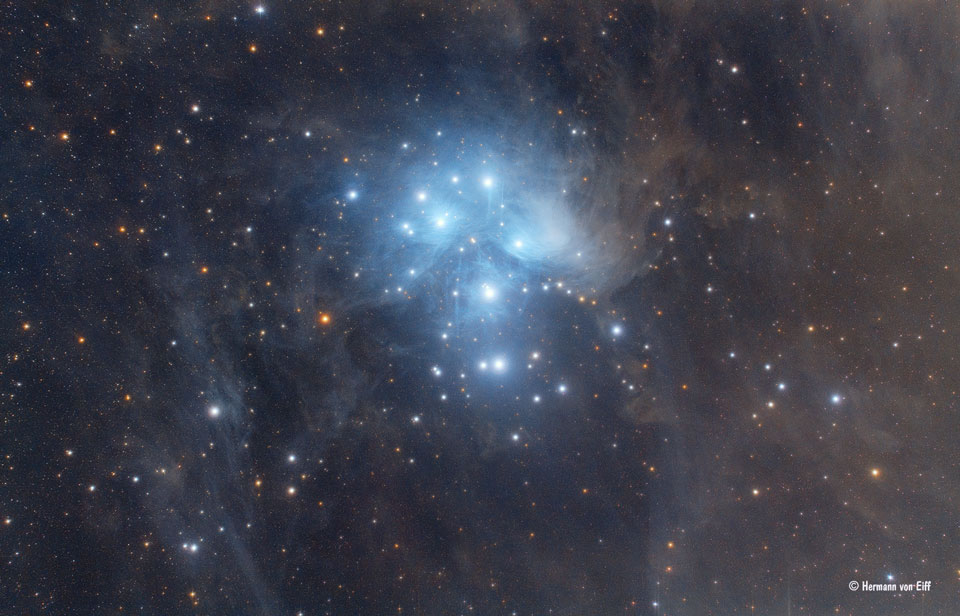
You can clearly see how colorful this region actually is, with many stars with color and many different colors and color tones in the reflection nebula and surrounding dust. I think this is an excellent example that shows how important good stars in an image are and how they contribute to the overall quality and attractiveness of the image.
Some quick tips for imaging the Pleiades
Some quick tips for imaging the Pleiades are:
- Focus, focus and re-focus!
- Pick the proper ISO
- Choose exposure time carefully
- Use different exposure times
- Make sure you get the colors right
- Go easy on the contrast
- Protect the stars in processing
- Use MorphologicalTransformation to shrink stars
- Use precise Curves adjustment to get the dust to stand out more
Blown out and bloated stars are quite often (partly) due to inaccurate focussing and lack of refocus when temperature changes. Make sure you focus carefully and refocus when temperature changes. Depending on your scope focus might shift also during the change of the telescope and focuser’s angle.
Still many people choose an ISO value that is way too high. Especially with the Pleiades it is important to make sure you choose the ISO value carefully to preserve dynamic range and prevent stars from bloating and clipping already in camera.
This fov is tricky because the main stars of the Pleiades will be clipped with very short exposures already, while the nebulosity and dust can be fairly challenging to pick up. In this case it’s important to trust the power of stacking and don’t worry if you hardly see any dust and nebulosity (or none at all) in a single frame. Make sure you get enough frames and pick the exposure time wisely based on circumstances and time available on the target. I’d aim for a minimum of 25 frames and recommend to have 40 or more.
High dynamic range objects like the Pleiades can benefit greatly if you use different exposure times and combine them in an HDR image. This way you can use the longer exposure times to capture and register the nebulosity and dust and shorter exposures for the stars.
In PixInsight there is the great HDRComposition tool available to do this.
It is interesting that so many images of the Pleiades have incorrect color calibration. This is evident from the background that quite often is blue. Maybe it is because we know the reflection nebula is blueish and people try to hard to get the blue color really showing. Proper colors in astrophotography is highly subjective, but one thing we do know is that the background shouldn’t be blue.
Be subtle in your image processing and make sure you don’t clip the background (and more stars) when applying some contrast curves while trying to get some detail in the reflection nebula. If you do want to enhance the contrast, use proper masks so that you apply contrast locally there where the image benefits from it the most.
This really is a tricky subject for processing, which makes it a good learning object but maybe also a frustrating one. Make sure to take all basic precautions and steps for good star preservation. For instance, if you work in PixInsight, use MaskedStretch for the initial stretching of the image.
Furthermore make use of good star masks and stretch and saturate the stars separate from the rest of the image. Don’t be afraid to push saturation on the stars to see if and how much color there is present, it might not be obvious at first if you caught and registered the color in the stars.
One way to get the dust and nebulosity to stand out more is to use MorphologicalTransformation to shrink stars and make then less prominent.
Most often you can/need to do a bit more stretching after this to highlight the nebulosity more.
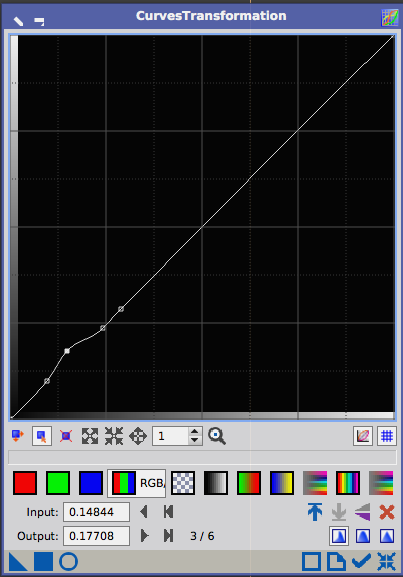
With a precise curves adjustment as shown here, you can target the dust quite specifically and get it to stand out just a bit more.
Good luck capturing this amazing object and field of view!

Excellent article. Thank you. TIP: 3rd April, 2020 at sunset, Venus will be situated IN the Pleaides! How best to capture that once in a lifetime shot? The planet will be half illuminated, so the disc is not going to be large. It will require HDR for sure!