Adding multiple exposures to create a single image is one of the key elements of doing astrophotography. It enables us to get rid of bad pixels, satellite trails, noise while increasing signal to increase the overall signal-to-noise ratio. It truly is one of the most important aspects of astrophotography.
But stacking remains a bit of a mystery to most people and they will keep having questions like ‘How many frames should I stack?’, ‘Am I better off shooting 20x5mins or 10x10mins?’ and ‘which rejection algorithm should I use?’.
In this article I want to briefly discuss how stacking works and what the benefits are. Then I’ll discuss in detail an analysis I did on my own images.
Spoiler alert: While you will get a diminishing return in terms of noise cancellation, the overall SNR gain keeps increasing in an almost a linear fashion when you keep adding more frames to your stack.
What does stacking actually do and how does it benefits my image?
To better understand what stacking does to your image and how it works it is useful to simplify things and think of your image as a single pixel. Stacking is a procedure that works on individual pixels separately, so this is an accurate representation.
Stacking a lot of subs will have two great benefits:
1. Increase the SNR
Each pixel will have a certain value, representing the total amount of electrons ‘in’ that pixel. This amount of electrons is made up by the actual signal (the photons) that are captured, along with thermal noise and other inherent (bias) noise, plus some random noise. If you stack an image you are basically adding up all the values of this pixel. The signal will be more or less the same value on each frame under consistent circumstance, however, the random noise will follow a Gaussian distribution. This means that while taking more samples (images), the average value of this noise is approaching the center of this Gaussian distribution. Under normal/neutral circumstances this would be 0. Since we also have signal, it is the value of this signal that comes out in the end of the averaging out of all the random noise.
2. Increase the dynamic range
This is often overlooked, but increasing the dynamic range is really important in astrophotography.
The dynamic range is basically the amount of information that can be stored in 1 pixel. This is determined by the minimum value and maximum value; the difference is the dynamic range. For any single image the minimum value of a pixel is 0 and the maximum value is determined by the A/D converter, which is 12 or 14 bits in many cases.
So, if a signal is not bright enough to excite the pixel to a value of 1, it is not picked up and increasing the number of frames in your stack won’t do you any good in getting this signal, even though the true value might be something above 0. If it is read as 0.31310… and translated to 0 you’ll loose this information and it won’t do any good in the stack; any number times 0 will still be 0 🙂 On the other hand, when a bright signal exceeds the limit of the A/D converter, the pixel will be clipped on the highest value.
You might already see what will happen when we are going to stack images and add the pixel values; the minimum value is still 0, but the highest value is increasing basically with the number of frames you add. So when you add subs, the dim parts of the image will get higher values and thus become visible, while the bright parts are running up as well, without clipping since the maximum value increases. The noise sometimes will actually help getting the faint signal, since it can help raise the true value to something that will be recorded as 1 or even 2 or 3. So noise occasionally can actually be a good thing 😉
The effect of stacking images, a detailed analysis
Ok, so you understand how stacking works and what the benefits are, but what about the questions I asked at the beginning? ie; how many frames do we need to stack for to cancel out this noise? Is it better to shoot 10x2min or 2x10min? etc. Let’s look at some real data from my own images.
Here is a graph representing the measured noise for different images I took with different camera’s under different circumstances. I measured the noise for a single frame and then for stacks of increasing number of frames at 5 frames intervals;
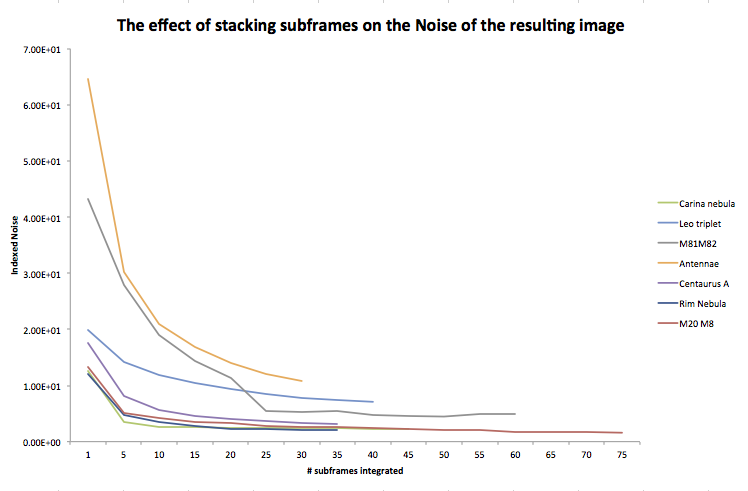
We can immediately see the described effect; the noise is cancelled out when stacking images. Stacking more images means cancelling out more noise, with a clear diminishing effect. You can see very well that the initial drop in noise is really strong and the diminishing effect occurs quite quickly. The conclusion I take away from this personally is that I always aim to have a minimum of around 25 frames in a stack. I will adjust my exposure time based on this. So if I know I will have only one night of imaging on a certain object, and it will be around 3 hours at a desirable location in the sky (high enough) I’ll divide the 180mins. by 25 frames to get a maximum exposure of 7 minutes. If I know I’m gonna spent two nights on it I can go to 14minutes etc. Of course other factors come into play when determining the desired exposure, but at least the 25 frames rule give me guidance at the max exposure I should use.
Furthermore you can clearly see the effect of the sky quality in the graph; the images from my trip to Namibia have the lowest initial noise. Leo Triplet and M81M82 are from my trips to Hohen Woos and Antennae (galaxies) is from La Palma.
Also interesting to note is that the noise levels of those images never reach the levels of those shot in Namibia! So this once again shows the importance of real dark skies without light pollution.
Another very interesting thing can be seen if we normalize the graph where we set the individual exposure to ‘1’ and plot the relative noise in each image;
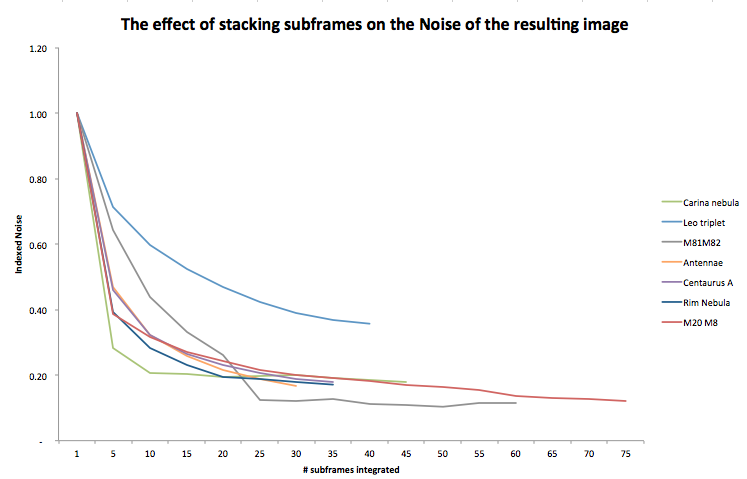
Apart from the Leo Triplet image (not sure what’s going on there… ) we can see that all images have more or less the same curve and same noise cancellation gains; they all end up at roughly 18% noise from a single exposure.
At this point you might start to wonder if taking around 25 images is enough and if taking more frames is of any use? To answer this question we need to take into account that we are not just battling noise, we are trying to increase (faint) signal as well! So looking at the noise is not sufficient.
So here is the graph for the SNRWeight that represents the signal-to-noise ratio;
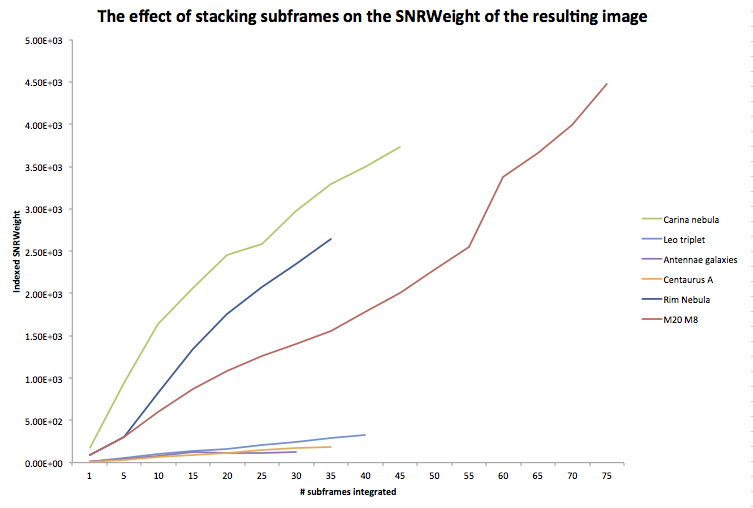
The difference between a picture of a huge nebula and small galaxies is clearly visible here of course. Also nicely visible is the ‘jump’ for M20M8 at 55 to 60 frames, which was the start of another night. Since same settings were used I must conclude it was due to better sky conditions.
To have a better overview of the SNR gains for all pictures, I’ve indexed the values by dividing by the value of the single exposure.
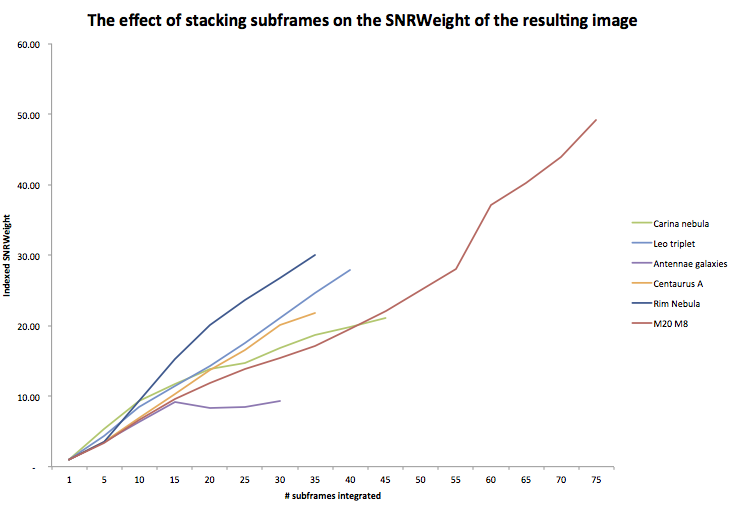
Wow! That’s a really clear picture! The overall SNR keeps climbing on nearly the same rate well past the 25 frames. So even though you might not gain much noise cancellation anymore, you are still getting more signal and thus a better SNR. But you have to remember that you would need to have to record the faint signal to benefit from this. So when you will be able to get (well) past the 25 frames you’d suggest that you start increasing your exposure times.
Ok, so the gain is clearly measurable and visible in the graphs. But what is the impact visually on the images? Which gains can still be (easily) visibly seen?
Let’s look at some comparisons of details for some of these pictures;
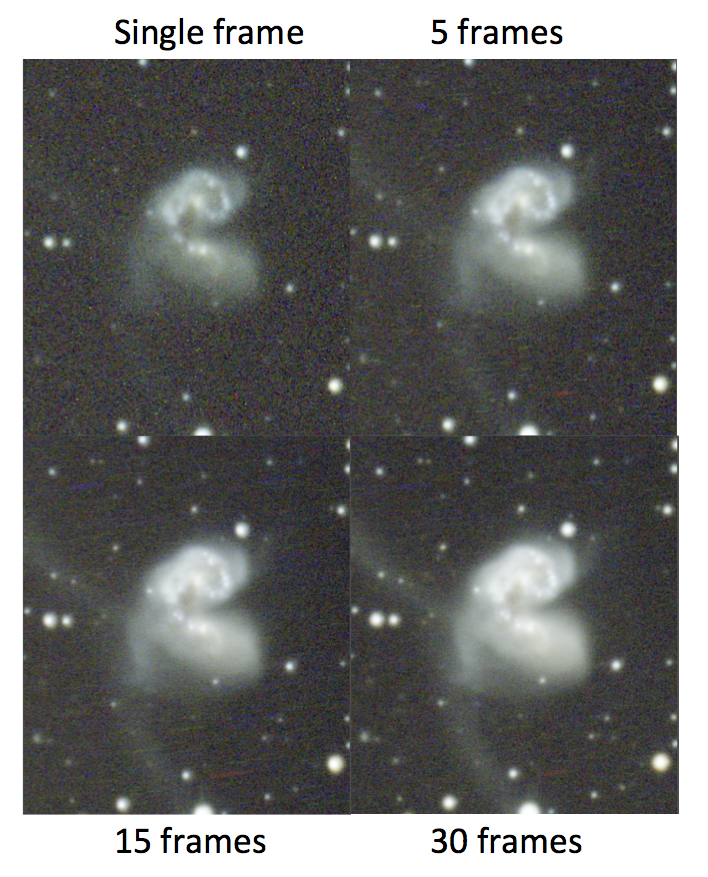
You can clearly see the effects of both benefits of stacking; increased dynamic range (we get more faint signal to stand out) and less noise. The difference between 15 and 30 frames is also still quite strong. However, we can see some hot pixels that are ‘smeared out’, so we should use some pixel rejection in this stack. The effect of this can be seen below:
![]()
I’ll do a more complete write up on the analysis of different pixel rejection methods soon. For now just stick with using Linear fit clipping.
The Antenae galaxies picture was the ‘worst’ performer in terms of SNR, so let’s take a look at another galaxy picture; Centaurus A from Namibia.

Again the effects are strongly visible, especially in terms of the background noise.
Now let’s look at a nebula picture, the widefield of M20 and M8;
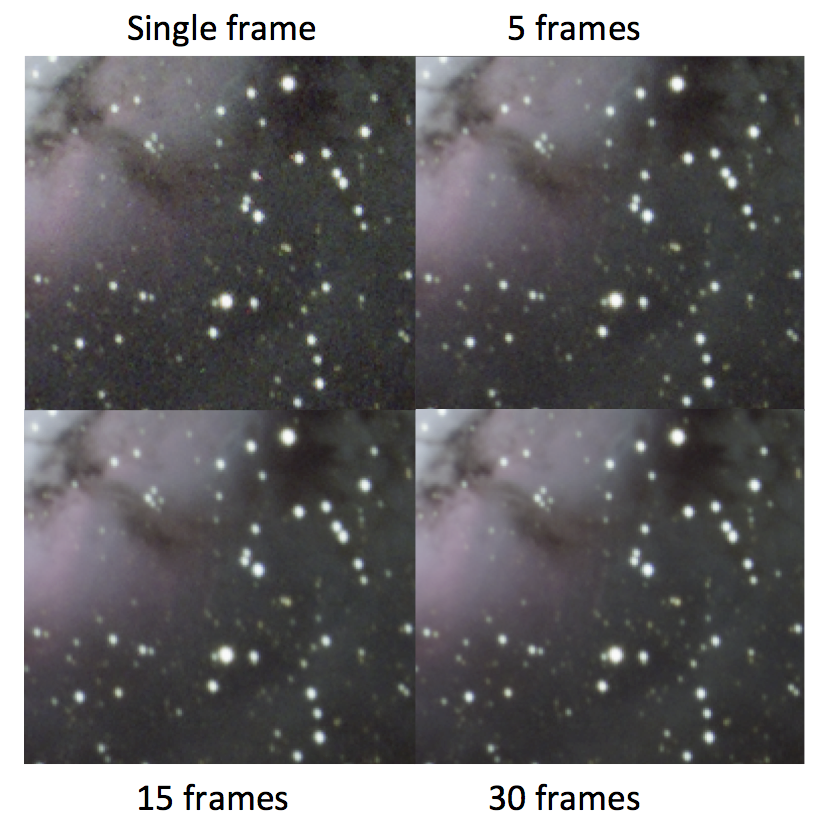
The benefits of stacking more frames are clearly visible again. Since I took quite a few more frames we can look if we can also see this for even more frames stacked;
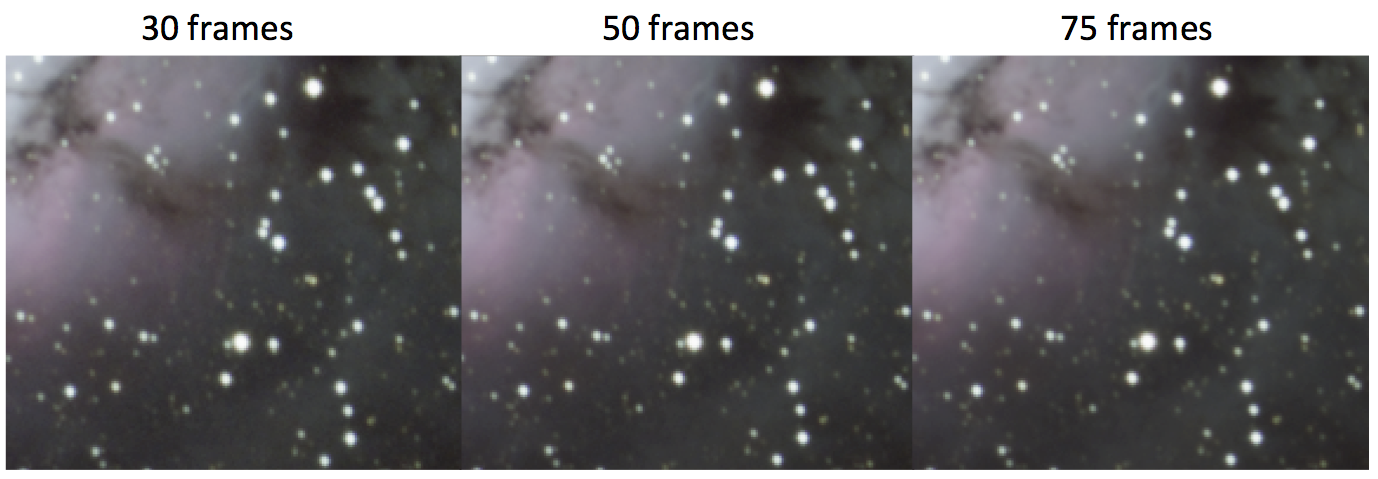
In terms of noise you can notice the diminishing effects we saw in the graphs; I personally can hardly tell the difference between the frames in terms of noise. However, the faint nebulosity seems to be gaining still from the increased number of exposures. Although I have to admit that also this effect is hardly visible between frame 50 and 75. At this point I could be convinced that 50 frames would have been sufficient for this part of the image. But you have to keep in mind that this will be really dependant on the object you are imaging.
Conclusion and advice on the benefits of stacking more frames
The most important conclusion is that stacking frames will benefit the final result not just in terms of Noise, but also in terms of Dynamic range. Keep this in mind!
The noise cancellation has a clearly visible diminishing return after around 25 frames. Aim for this number of frames as a minimum in your stack. Increase exposure time appropriately if you know for sure you are going to get 25 subs.

Great article Chris! This is very helpful and i will use these guidelines for my sessions. Thanks for the evaluations.
Great articles, Chris! This particular article was an eyeopener to me, as I – as a consequence to not having a auto guiding camera/software but only Synscan Goto – are taking a lot of shorter exposures…
I can maximum do 1 minute exposures and often stay at 30 second exposures (to get round stars) 🙁 so I can easily have 100-400 subs from one night (once I even ended up with 800 even shorter exposures from one night)…!
As my computer is quite old it takes Pixinsight a long time to calibrate and stack :-/
I’m now wondering how you did the calculations and graphs? I would like to do the same “test” on my setup, so I can discover at what number of frames I should consider stop imaging?
I understand the last part concluding that the dynamic range will increase, but it would be nice to not block my computer for 3-4 for full days if the gain is minimal 😉
I guess auto-guiding should be the next equipment to invest in – but how do you manage power for the computer when auto-guiding on a field trip in the wild (or is it possible to autoguide without a computer)?
For the auto-guiding I’m using the Lacerta MGEN autoguider, I don’t want to work with a laptop in the field 🙂
As for the number of exposures and test, it is really about the total exposure time you are getting which will be a matter of diminishing return as you can also read in some of my other articles.
To test it I stack different number of frames and use the statistics in PixInsight to measure the properties of the resulted image. (something like the ‘Statistics’ process, or noiseevaluation in scripts)
Hi! I use Synguider as guider camera with good results. And at the date I only made tests taking my mount to its limit, using an EQ6 + Newton 254/1200 + Mak 102/1300 (as guidescope) + synguider. Smaller OTA should work even better. I made 300 sec subs perfectly. This is an example, 240 sec… https://www.facebook.com/photo.php?fbid=10214129023572284&l=9f7dabc9af
I know, I need to learn more about procesing. ))
Saludos! (And sorry about my english)
PS: Great web Chris! Thank you for share your knowledge!